Gatsby 설치
Gatsby로 블로그를 만드려면 당연히 Gatsby를 설치해야 한다.
Gatsby 설치방법은 다음과 같다.
npm install -g gatsby-cliGatsby는 무료이고, 오픈소스로 되어있다.
공식문서를 참조하고싶다면 여기에서 확인 할 수 있다.
Gatsby starter 고르기
Gatsby를 설치했다면, 이제 Gatsby로 프로젝트를 생성해야 한다.
하지만, 생성전에 여러가지 Starter나 Theme들로 기본틀을 만들고 시작 할 수가 있다.
공식사이트의 Resource 를 참조하여 괜찮을 것 같은 Stater나 Theme로 시작해보거나 Showcase에서 다른사람들의 완성물을 참조해보자.
gatsby-starter-blog
나는 블로그의 기본적인 틀과 JAM Stack 구현이 이미 끝난 gatsby-starter-blog를 선택하였다.
거의 모든 gatsby 블로그들은 이 starter로부터 파생됐다고 말해도 과언이 아니다.
gatsby-starter-blog의 특징은 다음과 같다.
- Blog 기본 틀
- RSS feed
- Markdown
- 등등…
설치
다음과 같이 starter를 적용시킬 수 있다.
gatsby new my-gatsby-project https://github.com/gatsbyjs/gatsby-starter-blog다음과 같이 실행을 하면, git clone, npm install이 모두 적용된다.
gatsby-starter-bee
jbee님이 만들어주신 gatsby-starter-bee를 이용하는것도 좋은 방법이다.
이 방법은 블로그에 필요한 거의 모든 기능이 이미 구현되어져있기 때문에, 설치 후 몇가지 설정만 바꿔주면 바로 블로그로 사용할 수 있다. gatsby 블로그 스타터 중에서 프레임워크라 부를만한 정도로 구성되어 있다.
설치
gatsby new my-gatsby-project https://github.com/JaeYeopHan/gatsby-starter-bee로 설치 할 수 있다.
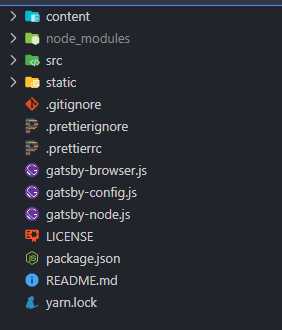
폴더구조
설치후에는

다음과 같이 폴더 구성이 되어 있다.
여기서 주요한 폴더 및 파일만 설명을 하자면,
-
content :
- 우리가 포스팅(블로깅) 할 게시글과 이미지 등 포스팅 리소스들이 저장 될 곳. (markdown 파일로 작성한다)
- 보통 년도별이나 카테고리별로 폴더를 구분한다.
-
src :
- 소스폴더. javascript와 react framework를 통해 개발 및 유지보수를 할 수 있다.
-
gatsby-browser.js :
- gatsby의 browser 관련 API들을 구현할 수 있는 곳.
-
gatsby-config.js :
- gatsby로 만든 사이트의 기본 config 파일이다. 우리 사이트의 meta데이터 (title, description 등)를 설정하고, gatsby-plugin을 설정할 수 있다.
-
gatsby-node.js :
- gatsby의 node 관련 API들을 구현할 수 있는 곳.
이정도만 알아두면 추후 필요한 기능이 있을 때 어떤 설정파일을 손봐야 하는지 알 수 있을 것이다.
왠만한건 다 공식문서에 있다.
설정 커스터마이징하기
그럼, 이제 이 config 파일들에 대해 커스터마이징을 하자.
우선 gatsby-config.js 파일에서 사이트 meta데이터 설정을 커스터마이징하자.
gatsby-config.js 수정
module.exports = {
  siteMetadata: {
    title: `Gatsby Starter Blog`,
    author: {
      name: `Kyle Mathews`,
      summary: `who lives and works in San Francisco building useful things.`,
    },
    description: `A starter blog demonstrating what Gatsby can do.`,
    siteUrl: `https://gatsby-starter-blog-demo.netlify.app/`,
    social: {
      twitter: `kylemathews`,
    },
  },
  // ...
라고 되어있는데, 자기 사이트에 맞게 변경해주자.
나는 사이트의 메타데이터 내용이 별도 파일로 관리해주고싶어서 site-meta-config.js를 만들어 관리하기로 하였다.
site-meta-config.js 생성
module.exports = {
  title: `HaYoung's Log`,
  subtitle: `타고난 대기만성 성장러 하영의 로그`,
  description: `타고난 대기만성 성장러 하영의 로그`,
  author: {
    name: `@Ha-Young`,
    summary: `live in Seoul, Korea`,
  },
  introduction: `안녕하세요. 타고난 대기만성 성장러 하영의 로그입니다.`,
  siteUrl: `https://ha-young.github.io/`, // Your blog site url
  social: {
    github: `hayeong28@naver.com`, // Your GitHub account
    medium: ``, // Your Medium account
    facebook: `hayoung28/`, // Your Facebook account
    linkedin: `ha-young-choi-1ba15b1b7`, // Your LinkedIn account
    instagram: `niceha0`,
  },
  icon: `content/assets/logo_haong.png`, // Add your favicon
  keywords: [
    `blog`,
    `gatsby`,
    `application`,
    `react`,
    `Ha-Young`,
    `HaYoung`,
    `FontEnd`,
    `Developer`,
    `Ha-Young's Log`,
  ],
  comment: {
    utterances: 'Ha-Young/my-blog-old', // Your repository for archive comment
  },
}
최상위 폴더에 다음과 같이 site-meta-config.js 파일을 만들었고, 나중에 필요할 것 같은 정보들도 기입을 했다.
아래 comment에 있는 utterances는 블로그 포스팅 댓글을 git-hub으로 관리할 수 있는 플러그인이다.
gatsby-config.js에 가져오기
그럼 이제, site-meta-config.js를 gatsby-config.js에 가져오면 끝난다.
const metaConfig = require("./site-meta-config")

module.exports = {
  siteMetadata: metaConfig,
  plugins: [
      // ...
  ]
  / ...
}
이렇게 meta데이터를 커스터마이징 할 수 있다.
다음시간에는 개발 방법과 github.io에 deploy하는 방법을 올려보겠다.