* 이 글은 MDN, Vanilla Coding Prep 강의자료, PoiemaWeb등 공신력있는 곳들을 참조한 글입니다.
Prototype?
프로토타입은 자바스크립트를 작동시키는 근간이 되는 개념중 하나이다.
이 프로토타입의 동작 원리를 알아야 MDN에서 Obejct.hasOwnProperty() Array.prototype.splice()와 같은 표준 내장객체의 prototype 메서드들의 원리와 객체(Object) 상속 원리를 이해할 수 있다.
또 javascript는 이 Prototype 기반의 객체지향 언어로, 다른 클래스 기반의 객체지향언어와는 다르다. 하지만 클래스기반 객체지향 프로그래밍의 특징 중 하나인 상속을 복제의 과정을 통해 구현할 수 있으며, 클래스 기반 객체지향보다 좀 더 인스턴스 지향적이다.
가장 핵심적인건 이 Prototype원리를 이용해 객체지향프로그래밍을 할 수 있다는데 있다.
Javascript Prototype 이해하기
객체의 prototype
🕶현재 객체에 속성이 존재하지 않으면 프로토타입을 참조
프로토타입의 동작방식에서 가장 기본적인 원칙은 우리가 가진 객체에서 Property를 읽을 때 만약 해당 Property가 없다면 자동으로 현재 객체의 prototype에서 해당 Property를 찾는다는 것이다.
이를 알 수 있는 가장 좋은 예제가 바로 Object 내장객체에 포함되어있는 메서드들이 우리가 생성한 객체들로도 쓸 수 있다는 점이다.
const human = {
  name: 'ha-young',
  age: 30,
}

console.log(human.toString()) // toString 속성은 없지만 사용된다.
console.log(human.hasOwnProperty('name')) // hasOwnProperty 속성은 없지만 사용된다.
human 객체에서 toString() 과 hasOwnProperty()메서드를 선언한 적이 없지만 사용 할 수 있다.
어떻게 사용이 되는 것일까? 이 메서드들은 Object.prototype에 있는 메서드들이다.

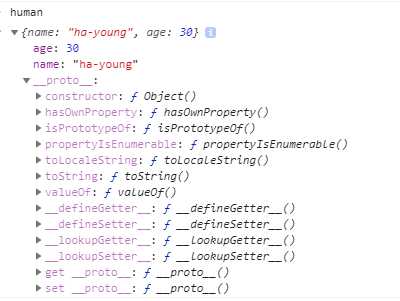
human 객체를 콘솔에 출력해보면 __proto__속성으로 내장객체인 Object 를 가지고 있다.
바로 이것이 프로토타입으로, 프로토타입의 가장 기본적인 원칙인 프로퍼티를 참조할 때, 현재 객체에 존재하지 않는다면 프로토타입 체인이 연결되어있는 순서대로 타고 올라가면서 프로퍼티를 찾게된다. 바로 그 프로토타입을 확인해볼 수 있는것이 __proto__ 속성이고 위 human 객체의 프로토타입은 Object내장객체 이다.
사실 __proto__ 속성을 접근하면 내부적으로 Object.getPrototypeOf 가 호출된다.
Object내장객체는 가장 근본이 되는 프로토타입으로 모든 객체들의 프로토타입 체인의 마지막은Object이다.
🏐프로토타입에 있는 속성과 메서드는 공유된다.
또 Array를 생성했을 때 모든 Array들이 다 같은 메서드들을 가지고 있는데, 이 메서드들은 Array.prototype에 있는 메서드들로 모든 Array마다 각자 가지고있는 메서드들이 아닌 Array.prototype에 있는 메서드들을 모든 Array객체에서 공유한다. 그리고 이 또한 프로토타입의 원리이다.
const arr1 = [1, 2, 3]
const arr2 = [10, 11, 12]
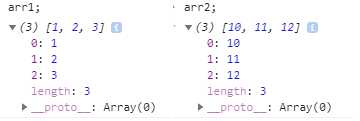
위 처럼 생성된 Array들을 각각 콘솔에 찍어보면 아래와 같다.

그럼 보는바와 같이 각각 Array객체 모두 우리가 사용하던 from(), splice(), push() 등과 같은 메서드들을 가지고 있지 않다.
당연히 이 메서드들은 Array의 프로토타입인 Array.prototype 이 가지고 있는 것이고, __proto__을 통해 확인할 수 있다.

console.log(arr1.__proto__ === arr2.__proto__) // true이를 통해 우리가 알 수 있는건, Array.prototype 프로토타입 객체는 딱 하나만 존재하고 있고, 새롭게 생성되는 Array객체들은 이 Array.prototype 프로토타입 객체안의 메서드들을 공유하는 개념이다.

생성자 함수
🎨생성자 함수란
우리가 new키워드와 함께 함수를 사용하면, 이 함수를 생성자 함수라고 부르는데, 이 생성자 함수는 새로운 객체를 생성하는 함수이자 일종의 틀이다.
new키워드로 호출된 함수는 내부에서 빈 객체를 생성하고, 빈 객체는 함수 내부에서 this키워드로 접근 할 수 있다.
// 생성자 함수
function Human(name, age) {
  this.name = name
  this.age = age
}

// 만들어진 생성자 함수로 객체 생성
const hayoung = new Human('ha-young', 30)
const hosam = new Human('hosam', 28)

console.log(hayoung) // Human {name: "ha-young", age: 30}
console.log(hosam) // Human {name: "hosam", age: 28}
이 생성자 함수는 return이 명시되어있지 않지만 자동적으로 return this를 수행한다.
만약
this가 아닌 다른 객체를 return 하면return this는 수행되지 않는다.
그리고 생성자 함수 내부에서의 this는 빈 객체로 자동생성되어져 이후 this.name = name 과 같은 코드에 의해 객체에 속성이 할당되는 것.
생성자 함수의 특징 요약
- 생성자 함수는 대문자로 시작하는 명사로 네이밍
new키워드는 빈 객체를 생성하고 함수 내부에서this로 접근 할 수 있다- 생성자 함수는 별다른
object리턴이 없으면return this로 자동반환한다. - 반환된 객체는 인스턴스 라 불린다.
🎭리터럴에 내부적으로 작동하는 생성자 함수
또 우리가 흔히 리터럴로 생성한 객체들은 모두 내부적으로 생성자 함수로 만들어진다.
const obj = {}

const obj = new Object()
const arr = []
const arr = new Array()const func = function() {}
const func = new Function()✨🎯생성자 함수의 ‘prototype’ 속성
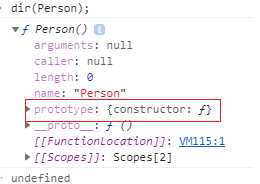
우리가 함수를 생성하면 자동적으로 이 property 속성이 만들어 진다.
함수에만 존재하는 prototype 속성이지만 오직 함수가 생성자 함수로 쓰였을 때만 의미가 있다.
function Person() {}
dir(Person)

이 prototype속성의 값은 객체로써 오직 함수에만 자동생성되어 존재하는데,
해당 함수가 생성자 함수로 쓰였을 때 그 생성자 함수가 생성하는 객체의 프로토타입 즉, __proto__로 이 prototype 속성의 객체가 설정된다.
const hoho = {
  prop1: 'haha',
  prop2: 'hihi',
}

function Person() {}
Person.prototype = hoho

const person1 = new Person()
const person2 = new Person()
console.log(person1.__proto__) // {prop1: "haha", prop2: "hihi"}
console.log(hoho === person1.__proto__) // true
console.log(hoho === person2.__proto__) // true
맨 마지막 라인만 봐도 같은것을 알 수 있다.
또 여기서 다시한번 프로토타입 객체는 생성된 객체들과 공유되는 것을 알 수 있다.
person1, person2 객체 모두 hoho객체를 프로토타입으로 공유한다.
console.log(person1.prop1) // 'haha'
console.log(person2.prop1) // 'haha'
당연히 같은 값이 나오게 된다.
어떨 때 생성자함수, 어떨 때 프로토타입?
그럼 어떨 때 생성자 함수를 쓰고 어떨 때 프로토타입을 써야할까?
답은 간단하다.
각 객체마다 개별적으로 있어야되고 변동사항이 생길 것 같은 속성은 생성자 함수로, 모든 객체에서 같은값으로 공유해야하는 속성은 프로토타입 객체의 속성으로 설정하면 된다.
- 생성자 함수 : 필드 속성, 초기화
- 프로토타입 : 메서드
function MyArray(name) {
  this.arr_ = [] // 배열 초기화
  this.length = 0 // 각 배열마다 가지고있어야하는 변동사항 - 필드
  this.name = name // 필드
}

// 메서드
MyArray.prototype.push = function(item) {
  this.arr_[length] = item
  this.length++
}

// 메서드
MyArray.prototype.pop = function() {
  const result = this.arr_[length - 1]
  this.length--
  this.arr_.length = this.length // arr_ 배열의 마지막데이터를 없앤다.
  return result
}

//메서드
MyArray.prototype.printName = function() {
  console.log(this.name)
}

const myarr1 = new MyArray('myarr1')
const myarr2 = new MyArray('myarr2')

// 두 객체 모두 똑같은 MyArray.prototype의 printName()이 호출된다.
myarr1.printName() // myarr1
myarr2.printName() // myarr2
console.log(myarr1.printName === myarr2.printName) // true
프로토타입 체인
마스터프로토타입
모든 객체 (function, array 포함)는 Object.prototype의 메서드를 가지고 있다.
hasOwnProperty(), keys(), values() 등등
Object.prototype은 마스터 프로토타입으로써 프로토타입 체인의 끝에는 항상 Obejct.prototype이 있기 때문이다.
Object.prototype.hi_chain = function() {
  console.log('hi, this is prototype chain')
}

const arr = [1, 2, 3]

arr.hi_chain() // hi, this is prototype chain

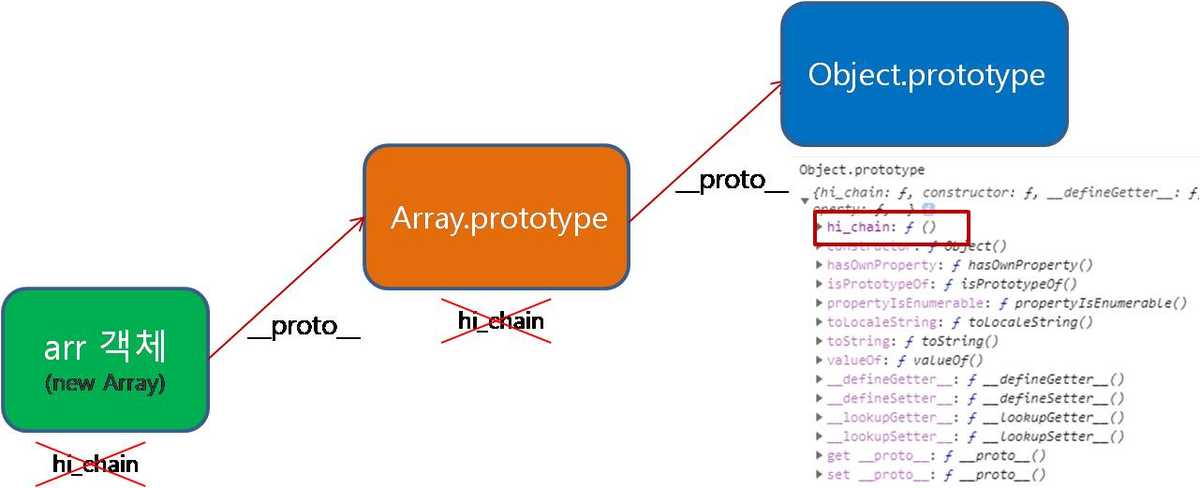
위 사진처럼 hi_chain()을 찾아가는 과정처럼 속성을 찾아 프로토타입을 계속해서 참조해서 나가는 것이 바로 프로토타입 체인이다.
위 사진은 객체 - Array.prototype - Object.prototype 이렇게 프로토타입 체인이 형성되었다고 볼 수 있다.
prototype VS __proto__
우리가 앞서 설명을 봐 왔다면 prototype 속성과 __proto__속성을 봤을 것이다.
둘 다 프로토타입 객체에 접근한다는 것 같은데 어떤 차이가 있는 것일까?
prototype 속성
prototype속성은 오직 함수에만 자동적으로 생성되어 존재하며 값은 프로토타입 객체이다.
function nonConstructor() {
  console.log("I'm not constructor function")
}

console.log(nonConstructor.prototype)

생성자 함수가 아니라도 함수라면 무조건적으로 자동으로 생성되며,
자동으로 생성된 prototype 객체에 별다른 추가작업을 하지 않는다면 위 처럼 constructor와 __proto__ 두 개의 속성만 존재하게 된다.
const arrowFunc = () => {
  console.log('arrow Func')
}

const expressionFunc = function() {
  console.log('expression function')
}

function ConstructorFunc() {
  this.isConstructor = true
}

console.log(arrowFunc.prototype) // undefined
console.log(expressionFunc.prototype) // {constructor: f}
console.log(ConstructorFunc.prototype) // {constructor: f}
그리고 보는바와 같이 화살표함수는 prototype 속성이 자동으로 생성되지 않는다.
프로토타입 객체의 default 속성
- constructor : 해당 프로토타입객체를 생성시킨 함수 (생성자함수)
- __proto__ : 생성된 프로토타입 객체의 프로토타입
함수 prototype 속성의 역할
그럼 이 함수에만 생성되는 prototype 속성은 어떤 역할을 하는것일까?
이 prototype 속성은 단순히 속성으로 존재하기보다는 특별한 역할을 하도록 설계되어있다.
이 prototype속성은 함수가 생성자 함수로 쓰였을 때 생성되는 인스턴스의 prototype 이 된다.
즉, 생성된 인스턴스의 __proto__ 가 생성자 함수 prototype 속성의 객체가 된다.
function Human(name) {
  this.name = name
}

Human.prototype.canSpeak = true
Human.prototype.func1 = function() {
  console.log("prototype's function")
}

const hayoung = new Human('hayoung')

// 생성된 인스턴스의 프로토타입은 생성자함수의 프로토타입 속성의 객체값이다.
console.log(hayoung.__proto__ === Human.prototype)
__proto__ 속성
앞선 수많은 예제들로 __proto__가 무엇인지는 잘 알고 있을 것 같다.
이와 같은 __proto__를 dunder-proto(던더프로토)라고 부르는데, 이 던더프로토는 객체에 존재하는 속성으로 해당 객체의 프로토타입을 가리킨다.
사실 이 __proto__는 사용을 지양해야하고 Object.prototype의
- Object.prototype.getPrototypeOf()
- Object.prototype.setPrototypeOf()
를 사용해야 한다.
__proto__속성을 통해 [[Prototype]] 을 가져오고 설정하면 내부적으로 getPrototypeOf()와 setPrototypeOf()가 작동된다.
- [[Prototype]] : Prototype 객체를 뜻함
정리
그렇다면 prototype 속성과 __proto__ 속성의 차이는
prototype은 함수에 자동적으로 생성되고new키워드와 연계해서 인스턴스의__proto__로 만들어진다. (인스턴스의 프로토타입)__proto__는 단순히 객체의 프로토타입객체 [[Prototype]] 를 나타낸다.
상속 구현하기
자 그럼 이제 상속을 구현해보자.
상속의 방법은 여러가지가 있지만 아래와 같은 방법이 가장 스탠다드 하다고 할 수 있다.
우선, Javascript에서 상속을 하는 기본사항은 다음과 같다.
- 자식 생성자 함수에서 부모 생성자 함수를 통해 초기화 및 필드 부분 확장
- 자식의 prototype에 부모의 prototype 체이닝
우선 다음과 같이 부모를 만들었다고 가정하자.
(예제는 예전에 작성했던 여기에서 가져왔다)
function BootCamp(location, teacher) {
  this.location = location
  this.teacher = teacher
}

BootCamp.prototype.teach = function() {
  console.log(`${this.teacher} teachs in ${this.location}`)
}

BootCamp.prototype.isGood = function() {
  console.log("i don't know")
}
1. 자식 생성자 함수에서 부모 생성자 함수로 필드확장
자식 생성자 함수에서 부모 생성자 함수를 통해 초기화 및 필드 부분 확장하는 것은 다음과 같다.
function VanillaCoding(course, ...rest) {
  // 1. 부모 생성자 함수에 현재 인스턴스 바인딩시켜 확장.
  BootCamp.apply(this, rest)  // 자식객체에 확장할 필드
  this.course = course
}
보통 다음과 같이 생성자 함수 내부에서 부모 생성자 함수를 호출시키는데,
부모생성자.apply(this, rest)와 같이 자식 생성자 함수에서 생성된 빈 객체를 binding 시켜준다. apply로 호출하지않고 call을 사용해도 무방하다.
call, apply와 같은 this binding 함수를 모른다면 하옹의 자바스크립트 식사 - this 포스팅을 참조하자.
2. 자식 프로토타입에 부모 프로토타입 체이닝
1번처럼 자식 생성자 함수를 만들었다면 이제는 자식의 프로토타입에 부모의 프로토타입을 체이닝시켜야 한다.
체이닝 시키는 방법도 여러가지가 있지만 Object.create()를 사용하는게 가장 일반적이다.
Object.create()는 인자값으로 받은 객체를 프로토타입(__proto__)으로 설정하는 빈 객체를 반환한다. 참조
// 2. 자식 프로토타입에 부모 프로토타입 체이닝
VanillaCoding.prototype = Object.create(BootCamp.prototype)VanillaCoding.prototype.constructor = VanillaCoding
// 2번 이후로 프로토타입 필드, 메서드 할당
VanillaCoding.prototype.isGood = function() {
  console.log('yes, vanilla coding is good')
}
아래의 constructor를 새로 설정하는 것은
Object.create()로 만들어진 객체의 constructor속성이 없기 때문.
[[Prototype]]은 constructor속성을 가지고 있어야 한다.
전체 소스
//==============================부모 생성자=======================================
function BootCamp(location, teacher) {
  this.location = location
  this.teacher = teacher
}

BootCamp.prototype.teach = function() {
  console.log(`${this.teacher} teachs in ${this.location}`)
}

BootCamp.prototype.isGood = function() {
  console.log("i don't know")
}
//==============================================================================

//=======================상속받는 자식 생성자=======================================
function VanillaCoding(course, ...rest) {
  // 1. 부모 생성자 함수에 현재 인스턴스 바인딩시켜 확장.
  BootCamp.apply(this, rest)  this.course = course
}

// 2. 자식 프로토타입에 부모 프로토타입 체이닝
VanillaCoding.prototype = Object.create(BootCamp.prototype)VanillaCoding.prototype.constructor = VanillaCoding
// 2번 이후로 프로토타입 필드, 메서드 할당
VanillaCoding.prototype.isGood = function() {
  console.log('yes, vanilla coding is good')
}
//==============================================================================

// 실행
const prep = new VanillaCoding('prep9기', 'Samsungdong Seoul', 'Ken')
prep.teach() // 프로토타입 체인으로 부모의 teach 사용
prep.isGood() // 자식 프로토타입의 isGood 사용
왜 객체지향?
앞서, Prototype은 객체지향 프로그래밍을 하기 위한 방법이고, Prototype기반의 객체지향 프로그래밍은 상속을 복제의 과정을 통해 구현할 수 있다고 했다. 이제 프로토타입이 무엇이고, 상속은 어떻게 하는지 알겠다. 그럼 왜 이런 것들로 객체지향 프로그래밍을 하고자 하는 것일까?
가장 큰 이유는 아마 아래 3가지가 아닐까 싶다.
- 코드의 재사용성
- 유지보수의 용이성
- 기능 확장에 유리 (상속)
만약, 우리가 객체지향적으로 프로그래밍을 작성하지 않는다면 다음과 같은 코드가 나올 것이다.
const rectangle = {
  width: 10,
  height: 20,

  getArea: function() {
    return this.width * this.height
  },
  printInformation: function() {
    console.log(width, height)
  },
}

const square = {
  length: 10,

  getArea: function() {
    return this.length * this.length
  },
  printInformation: function() {
    console.log('this is square, length : ', length)
  },
}
위와같은 코드를 작성하게되면 단일 객체로 쓰이는 경우에는 상관없으나, 같은 형태의 객체들을 계속 재생성, 재사용하게 될 경우에는 문제를 야기시킬 수 있다.
rectangle과 square 간의 공통점이 존재함에도 각각 다른 객체 인스턴스로 생성이되어서 코드간의 중복이 발생하고 길이가 다른 rectangle, square가 나올 때 마다 객체 리터럴로 계속해서 생성해주는 번거로움이 생긴다.
위 코드를 객체지향적으로 표현하면 아래와 같은 이점이 생긴다.
코드의 재사용성
위 처럼 코드를 짠다면, rectangle에 대해서 재생성을 할 때 아래처럼 계속해서 생성할것이다.
const rectangle1 = {
  width: 10,
  height: 20,

  getArea: function() {
    return this.width * this.height
  },
  printInformation: function() {
    console.log(width, height)
  },
}
// ...
const rectangle2 = {
  width: 30,
  height: 50,

  getArea: function() {
    return this.width * this.height
  },
  printInformation: function() {
    console.log(width, height)
  },
}
//...
이를 객체지향적인 프로그래밍으로 바꿔주자.
function Rectangle(width, height) {
  this.width = width
  this.height = height
}

Rectangle.prototype.getArea = function() {
  return this.width * this.height
}

Rectangle.prototype.printInformation = function() {  console.log(this.width, this.height)}

const rectangle1 = new Rectangle(10, 20)
const rectangle2 = new Rectangle(30, 50)
위와 같이 객체지향의 생성자함수를 만들어주니 rectangle을 생성할 때 아주 쉽게 재생성 할 수 있다. 이것이 바로 객체지향의 재사용성이 되겠다.
유지보수의 용이성
유지보수의 용이성이란 수정하기 쉽다는 말인데,
만약 위 코드에서 printInformation의 출력 포멧을 수정해야 되는 상황이 발생했다고 치자 그럼 맨 처음 코드에서는 각각 객체 리터럴을 찾아다니며 printInformation을 수정해야 된다.
우리는 객체지향의 생성자함수와 프로토타입에 메서드를 만들어놨으므로 이 한 부분만 수정하면 번거로움없이 모든 객체에 대한 printInformation메서드 수정을 일괄적용시킬 수 있다.
function Rectangle(width, height) {
  this.width = width
  this.height = height
}

Rectangle.prototype.getArea = function() {
  return this.width * this.height
}

Rectangle.prototype.printInformation = function() {
  console.log(`width: ${this.width} height: ${this.height}`)}

const rectangle1 = new Rectangle(10, 20)
const rectangle2 = new Rectangle(30, 50)

rectangle1.printInformation() // width: 10 height: 20
rectangle2.printInformation() // width: 30 height: 50
위 처럼 프로토타입에 있는 메서드만 수정해줬는데도, 우리가 생성하는 모든 rectangle에 수정사항을 적용시킬 수 있다.
마찬가지로 그럴리는 없겠지만 넓이를 구하는 공식이 바뀌면 생성자 함수의 getArea 메서드만 수정해주면 된다.
이처럼 잘 작성한 객체지향적인 코드는 개발을 용이하게 하고 유지보수를 좀 더 쉽게 할 수 있다.
기능확장에 유리 (상속)
가장 위의 예제인 rectangle과 square가 나오는 부분을 보자.
square는 rectangle의 특징을 그대로 답습한다. 이럴때는 상속을 이용해 rectangle의 특성을 그대로 가져오면서 square만의 기능을 추가할 수 있다.
function Rectangle(width, height) {
  this.width = width
  this.height = height
}

Rectangle.prototype.getArea = function() {
  return this.width * this.height
}

Rectangle.prototype.printInformation = function() {
  console.log(`width: ${this.width} height: ${this.height}`)
}

function Square(length) {
  Rectangle.call(this, length, length)
}

Square.prototype = Object.create(Rectangle.prototype)
Square.prototype.constructor = Square

Square.prototype.printInformation = function() {
  console.log(`this is square, length : ${this.width}`)
}

const rect = new Rectangle(30, 50)
const square = new Square(30)

rect.getArea() // 1500
square.getArea() // 900

rect.printInformation() // width: 30 height: 50
square.printInformation() // this is square, length : 30
클래스 기반언어와의 차이
Javascript는 Prototype 객체지향 언어로, Prototype 기반의 객체지향언어와 Class 기반의 객체지향언어와의 차이점은 다음과 같다.
- Prototype 기반의 객체지향언어는 객체원형을 도중에 바꿀 수 있다.
- Prototype으로 설정된 객체는 공유될 뿐 재생성되지 않는다.
객체원형을 도중에 바꿀 수 있다
흔히 javascript를 동적인 언어라고 말하는데, 이를 prototype에서도 발견할 수 있다.
바로 객체의 원형을 도중에 바꿀 수 있다는 점인데,
const proto1 = {
  proto_name: 'proto1',
}

const proto2 = {
  proto_name: 'proto2',
  extend: 'is extended',
}

function Human(name) {
  this.name = name
}

// proto1로 설정
Human.prototype = proto1
Human.prototype.constructor = Human

// prototype이 proto1 객체로 설정된 인스턴스 생성
const hayoung = new Human('hayoung')
console.log(hayoung.proto_name) // proto1
console.log(hayoung.extend) // undefined <- proto1객체에는 extend 속성이 없다.

// proto2로 설정
Human.prototype = proto2
Human.prototype.constructor = Human

// Human의 프로토타입이 런타임중에 변경
const hosam = new Human('hosam')
console.log(hosam.proto_name) // proto2
console.log(hosam.extend) // is extended
이 처럼 코드가 실행되는 중에 객체원형인 Prototype을 변경할 수가 있다.
하지만 클래스기반의 객체지향 프로그래밍에서는 정해진 클래스대로의 인스턴스 생성만 가능할 뿐, 런타임중에 객체원형인 클래스를 변경할 수 없다.
클래스기반에서는 클래스가 객체원형이다.
계속해서 재생성되지 않는다
Prototype기반 객체지향에서 [[Prototype]]은 한번 생성되면 계속해서 공유되는 객체일 뿐 인스턴스가 생성될 때마다 새로 생성되거나 그러지 않는다.
하지만 클래스기반언어에서는 static으로 선언되지 않은 필드, 메서드에 대해서는 모두 인스턴스를 생성할 때 새롭게 생성되어진다.